I can guide you through the process of generating QR codes using ASP.NET MVC with ZXing. ZXing.Net is a popular open-source library for encoding and decoding QR codes. Let’s break down the steps into different parts: setting up the project, installing the ZXing.Net library, creating the controller, and designing the view. I’m using Visual Studio 2022 and for this project, I generate a QR code and export it to PNG with expired date text.
Step 1: Create an ASP.NET MVC Project
- Open Visual Studio and create a new ASP.NET MVC project. Name it “Habitpro.”
Step 2: Install Library NuGet Package
- Open Visual Studio.
- In the menu, go to
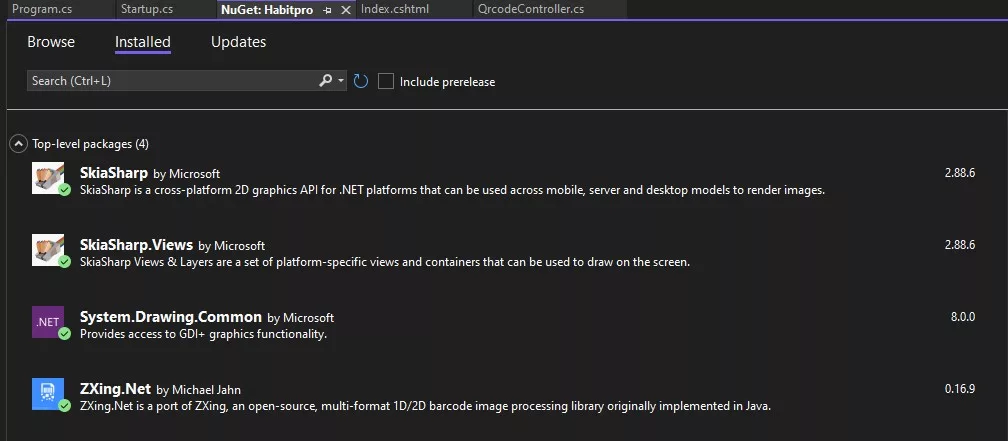
View > Other Windows > Package Manager Consoleto open the Package Manager Console. - Type and run the following commands:
Install-Package SkiaSharp
Install-Package SkiaSharp.Views
Install-Package System.Drawing.Common
Install-Package ZXing.Net
Step 3: Create the Controller
- Right-click on the “Controllers” folder in your project.
- Add a new controller named
QrcodeController.
using System;
using Microsoft.AspNetCore.Mvc;
using ZXing;
using ZXing.Common;
using ZXing.Rendering;

namespace Habitpro.Controllers
{
    public class QrcodeController : Controller
    {
        public IActionResult Index()
        {
            return View();
        }

        public IActionResult GenerateQrCode(string data)
        {
            var barcodeWriter = new BarcodeWriterSvg
            {
                Format = BarcodeFormat.QR_CODE,
                Options = new ZXing.Common.EncodingOptions
                {
                    Width = 100,
                    Height = 100
                },
                Renderer = new SvgRenderer()
            };
            DateTime currentDateTime = DateTime.Now;
            string formattedDateTime = currentDateTime.ToString("yyyyMMddhhmmss");

            var svgContent = barcodeWriter.Write(data + "-" + formattedDateTime);
            var svgString = svgContent.ToString(); // Convert SvgImage to string

            TempData["QrCodeSvg"] = svgString; // Store the SVG string in TempData

            return RedirectToAction("Index");
        }
    }
}
Step 4: Create the View
- Inside the “Views” folder, create a new folder named “Qrcode.”
- Inside the “Qrcode” folder, add a new view named
Index.cshtml.
@{
ViewData["Title"] = "Home";
}
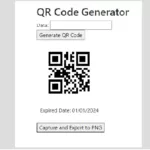
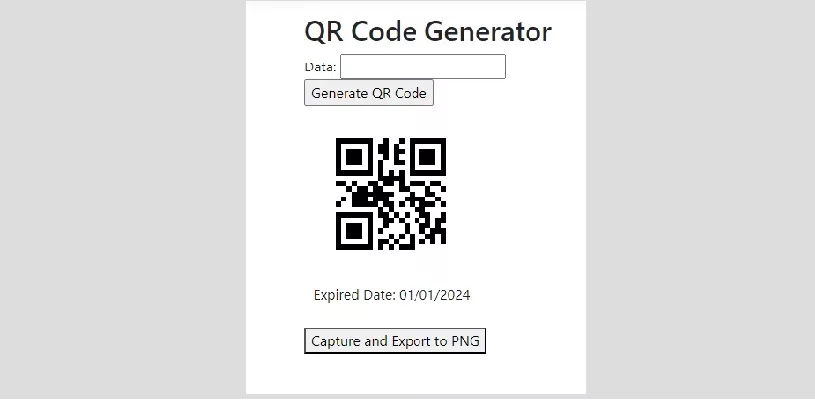
<h2>QR Code Generator</h2>
@using (Html.BeginForm("GenerateQrCode", "Qrcode", FormMethod.Get))
{
<label>Data:</label>
<input type="text" name="data" required />
<br />
<input type="submit" value="Generate QR Code" />
}
@if (TempData["QrCodeSvg"] != null)
{
<div id="imgQRContainer" style="width:200px; height:250px;">
<div id="imgQR" style="width:200px; height:200px;">
@Html.Raw(TempData["QrCodeSvg"])
</div>
<div style="width:100%; text-align:center">Expired Date: 01/01/2024</div>
</div>
<button id="Export">Capture and Export to PNG</button>
<script src="https://html2canvas.hertzen.com/dist/html2canvas.min.js"></script>
<script>
document.getElementById('captureButton').addEventListener('click', function () {
html2canvas(document.getElementById('imgQRContainer')).then(function (canvas) {
var link = document.createElement('a');
link.href = canvas.toDataURL();
link.download = 'captured_qr_code.png';
link.click();
});
});
</script>
}
Step 5: Configure Startup.cs
In Startup.cs, ensure that you have the necessary configuration for MVC.
using Microsoft.AspNetCore.Builder;
using Microsoft.AspNetCore.Hosting;
using Microsoft.Extensions.Configuration;
using Microsoft.Extensions.DependencyInjection;
using Microsoft.Extensions.Hosting;

namespace Habitpro
{
    public class Startup
    {
        public IConfiguration Configuration { get; }

        public Startup(IConfiguration configuration)
        {
            Configuration = configuration;
        }

        public void ConfigureServices(IServiceCollection services)
        {
            services.AddControllersWithViews();
        }

        public void Configure(IApplicationBuilder app, IWebHostEnvironment env)
        {
            if (env.IsDevelopment())
            {
                app.UseDeveloperExceptionPage();
            }
            else
            {
                app.UseExceptionHandler("/Home/Error");
                app.UseHsts();
            }

            app.UseHttpsRedirection();
            app.UseStaticFiles();

            app.UseRouting();

            app.UseEndpoints(endpoints =>
            {
                endpoints.MapControllerRoute(
                    name: "default",
                    pattern: "{controller=Home}/{action=Index}/{id?}");
            });
        }
    }
}
Step 6: Configure Program.cs
If you don’t have a Program.cs file, you can add one with the following content:
using Habitpro;
using Microsoft.AspNetCore.Hosting;
using Microsoft.Extensions.Hosting;

namespace Habitpro
{
    public class Program
    {
        public static void Main(string[] args)
        {
            CreateHostBuilder(args).Build().Run();
        }

        public static IHostBuilder CreateHostBuilder(string[] args) =>
            Host.CreateDefaultBuilder(args)
                .ConfigureWebHostDefaults(webBuilder =>
                {
                    webBuilder.UseStartup<Startup>();
                });
    }
}
Step 7: Run Your Application
Now, you should be able to run your application and navigate to the “/Qrcode” route. Enter data in the input field, submit the form, and you’ll see the generated QR code.
Make sure to adapt these steps to fit your project structure if needed. This example assumes the default ASP.NET MVC project structure.