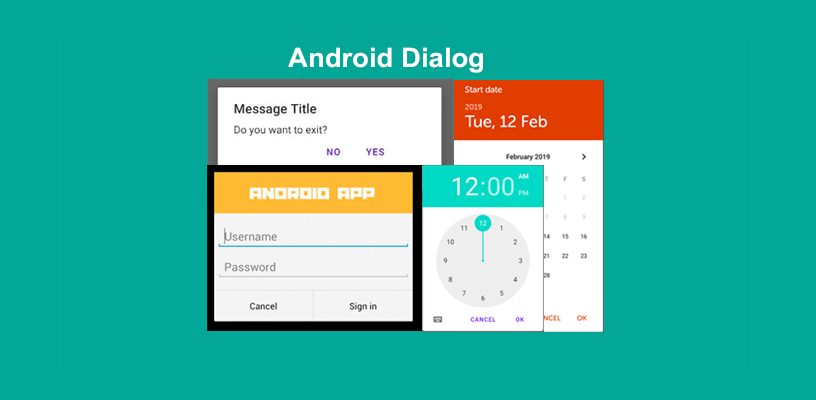
What’s a Dialog message? A Dialog message is a small window that shows information and prompts the user to choose or provide the information. Normally used for modal events that require users to take any action before they can continue, a dialog does not take up the entire screen.
A previous article has a Yes/No dialog message, but now I show more about the Dialog types.
Android Contents:
In Android, The Dialog has any types:
- TimePicker Dialog
- DatePicker Dialog
- Alert Dialog
- Custom Dialog
This article shows How to create them one by one.
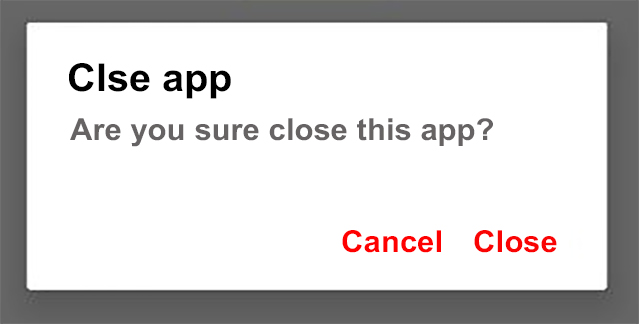
How to create an Alert Dialog message in Android Studio
Alert Dialog is a small window that shows the user a title, a message, and buttons (example button: YES, NO, OK, Cancel…) and prompts the user to make a decision and requires users to take an action.
In the Android Studio, follow with me step by step:
1 – Create a new android project
- Project name: My Alert Dialog
- Package name: com.eangkor.myalertdialog
- Language: Java
2 – In the activity_main.xml
<?xml version="1.0" encoding="utf-8"?>
<androidx.constraintlayout.widget.ConstraintLayout xmlns:android="http://schemas.android.com/apk/res/android"
    xmlns:app="http://schemas.android.com/apk/res-auto"
    xmlns:tools="http://schemas.android.com/tools"
    android:layout_width="match_parent"
    android:layout_height="match_parent"
    tools:context=".MainActivity">

    <Button
        android:id="@+id/btn_timepicker"
        android:layout_width="wrap_content"
        android:layout_height="wrap_content"
        android:text="Time Picker"
        app:layout_constraintBottom_toBottomOf="parent"
        app:layout_constraintEnd_toEndOf="parent"
        app:layout_constraintStart_toStartOf="parent"
        app:layout_constraintTop_toTopOf="parent" />

    <TextView
        android:id="@+id/txtTimePicker"
        android:layout_width="wrap_content"
        android:layout_height="wrap_content"
        android:text="Select Time Picker"
        app:layout_constraintBottom_toBottomOf="parent"
        app:layout_constraintEnd_toEndOf="parent"
        app:layout_constraintStart_toStartOf="parent"
        app:layout_constraintTop_toBottomOf="@+id/btn_timepicker"
        app:layout_constraintVertical_bias="0.114" />

</androidx.constraintlayout.widget.ConstraintLayout>
3- MainActivity.java
package com.eangkor.myalertdialog;

import androidx.appcompat.app.AppCompatActivity;
import androidx.core.content.ContextCompat;

import android.app.AlertDialog;
import android.content.Context;
import android.content.DialogInterface;
import android.content.Intent;
import android.content.SharedPreferences;
import android.os.Bundle;
import android.view.View;
import android.widget.Button;
import android.widget.Toast;

public class MainActivity extends AppCompatActivity {
    Button btnClose;
    @Override
    protected void onCreate(Bundle savedInstanceState) {
        super.onCreate(savedInstanceState);
        setContentView(R.layout.activity_main);
        btnExit=findViewById(R.id.btn_close);
        // On click event on close button
        btnClose.setOnClickListener(new View.OnClickListener() {
            @Override
            public void onClick(View v) {
                showAlertDialog();
            }
        });
    }

    private void showAlertDialog(){
        AlertDialog.Builder builder;
        builder = new AlertDialog.Builder(this);
        builder.setMessage("Are you sure close this app?");

        //Setting message manually and performing action on button click
        builder.setMessage("Are you sure close this app?")
                .setCancelable(false)
                .setPositiveButton("Close", new DialogInterface.OnClickListener() {
                    public void onClick(DialogInterface dialog, int id) {
                        //  Action for 'Close' button
                        //exit application
                        finish();
                        System.exit(0);
                    }
                })
                .setNegativeButton("Cancel", new DialogInterface.OnClickListener() {
                    public void onClick(DialogInterface dialog, int id) {
                        //  Action for 'Cancel' button
                        Toast.makeText(getApplicationContext(),"Cancel",Toast.LENGTH_SHORT).show();
                    }
                });
        //Creating a dialog box
        AlertDialog alert = builder.create();
        //Setting the title manually
        alert.setTitle("Close app");
        alert.show();
    }
}
Final Result:
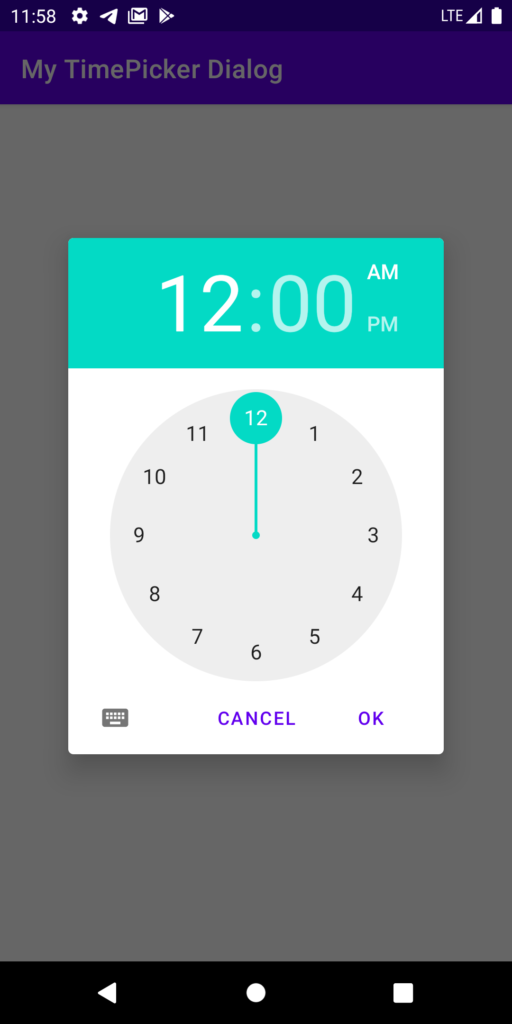
How to create a TimePicker Dialog in Android Studio
TimePicker Dialog is a small window that prompts the user for picking the time of the day like an hour, minute, second, and AM or PM.
1 – Create a new android project
- Project name: My TimePicker Dialog
- Package name: com.eangkor.mytimepickerdialog
- Language: Java
2- Go to activity_main.xml and paste the below code
<?xml version="1.0" encoding="utf-8"?>
<androidx.constraintlayout.widget.ConstraintLayout xmlns:android="http://schemas.android.com/apk/res/android"
    xmlns:app="http://schemas.android.com/apk/res-auto"
    xmlns:tools="http://schemas.android.com/tools"
    android:layout_width="match_parent"
    android:layout_height="match_parent"
    tools:context=".MainActivity">

    <Button
        android:id="@+id/btn_timepicker"
        android:layout_width="wrap_content"
        android:layout_height="wrap_content"
        android:text="Time Picker"
        app:layout_constraintBottom_toBottomOf="parent"
        app:layout_constraintEnd_toEndOf="parent"
        app:layout_constraintStart_toStartOf="parent"
        app:layout_constraintTop_toTopOf="parent" />

    <TextView
        android:id="@+id/txtTimePicker"
        android:layout_width="wrap_content"
        android:layout_height="wrap_content"
        android:text="Time Picker"
        app:layout_constraintBottom_toBottomOf="parent"
        app:layout_constraintEnd_toEndOf="parent"
        app:layout_constraintStart_toStartOf="parent"
        app:layout_constraintTop_toBottomOf="@+id/btn_timepicker"
        app:layout_constraintVertical_bias="0.114" />

</androidx.constraintlayout.widget.ConstraintLayout>
3- MainActivity.java
package com.eangkor.mytimepickerdialog;
import androidx.appcompat.app.AppCompatActivity;

import android.app.TimePickerDialog;
import android.os.Bundle;
import android.view.View;
import android.widget.Button;
import android.widget.TextView;
import android.widget.TimePicker;
import java.util.Calendar;

public class MainActivity extends AppCompatActivity implements View.OnClickListener {
    TextView getTimepicker;
    Button btnTimePicker;
    private int mHour;
    private int mMinute;

    @Override
    protected void onCreate(Bundle savedInstanceState) {
        super.onCreate(savedInstanceState);
        setContentView(R.layout.activity_main);
        getTimepicker = findViewById(R.id.txtTimePicker);
        btnTimePicker = findViewById(R.id.btn_timepicker);
        btnTimePicker.setOnClickListener (this);
    }
    @Override
    public void onClick(View v) {
        if (v == btnTimePicker) {
            //get time
            final Calendar calendar = Calendar.getInstance ();

            //launch picker dialog
            final TimePickerDialog timePickerDialog = new TimePickerDialog ( this, new TimePickerDialog.OnTimeSetListener () {
                @Override
                public void onTimeSet(TimePicker view, int hourOfDay, int minute) {
                                        String AM_PM;
                    if (hourOfDay>=0&&hourOfDay<12){
                        AM_PM=" AM";
                    }else {
                        AM_PM=" PM";
                    }
                    getTimepicker.setText ( hourOfDay + ":" + String.format("%02d",minute)+""+AM_PM );
                }
            }, mHour, mMinute, false );

            timePickerDialog.show ();
        }
    }
}
Final Result:
How to create DatePicker Dialog in Android Studio
DatePicker Dialog is a small window that prompts the user for picking the date of the month like day, month, or year.
1 – Create a new android project
- Project name: My DatePicker Dialog
- Package name: com.eangkor.mydatepickerdialog
- Language: Java
2- activity_main.xml
<?xml version="1.0" encoding="utf-8"?>
<androidx.constraintlayout.widget.ConstraintLayout xmlns:android="http://schemas.android.com/apk/res/android"
    xmlns:app="http://schemas.android.com/apk/res-auto"
    xmlns:tools="http://schemas.android.com/tools"
    android:layout_width="match_parent"
    android:layout_height="match_parent"
    tools:context=".MainActivity">

    <Button
        android:id="@+id/btn_datepicker"
        android:layout_width="wrap_content"
        android:layout_height="wrap_content"
        android:text="Date Picker"
        app:layout_constraintBottom_toBottomOf="parent"
        app:layout_constraintEnd_toEndOf="parent"
        app:layout_constraintStart_toStartOf="parent"
        app:layout_constraintTop_toTopOf="parent" />

    <TextView
        android:id="@+id/txt_DatePicker"
        android:layout_width="wrap_content"
        android:layout_height="wrap_content"
        android:text="Date Picker"
        app:layout_constraintBottom_toBottomOf="parent"
        app:layout_constraintEnd_toEndOf="parent"
        app:layout_constraintStart_toStartOf="parent"
        app:layout_constraintTop_toBottomOf="@+id/btn_datepicker"
        app:layout_constraintVertical_bias="0.114" />

</androidx.constraintlayout.widget.ConstraintLayout>
3- MainActivity.java
package com.eangkor.mydatepickerdialog;

import androidx.appcompat.app.AppCompatActivity;

import android.app.DatePickerDialog;
import android.os.Bundle;
import android.view.View;
import android.widget.Button;
import android.widget.DatePicker;
import android.widget.TextView;

import java.text.SimpleDateFormat;
import java.util.Calendar;
import java.util.Locale;

public class MainActivity extends AppCompatActivity {
    final Calendar myCalendar= Calendar.getInstance();
    Button btnDatePicker;
    TextView txtDatepicker;

    @Override
    protected void onCreate(Bundle savedInstanceState) {
        super.onCreate(savedInstanceState);
        setContentView(R.layout.activity_main);
        txtDatepicker=(TextView)findViewById(R.id.txt_DatePicker);
        btnDatePicker=(Button)findViewById(R.id.btn_datepicker);
        DatePickerDialog.OnDateSetListener date =new DatePickerDialog.OnDateSetListener() {
            @Override
            public void onDateSet(DatePicker view, int year, int month, int day) {
                myCalendar.set(Calendar.YEAR, year);
                myCalendar.set(Calendar.MONTH,month);
                myCalendar.set(Calendar.DAY_OF_MONTH,day);
                updateLabel();
            }
        };
        btnDatePicker.setOnClickListener(new View.OnClickListener() {
            @Override
            public void onClick(View view) {
                new DatePickerDialog(MainActivity.this,date,myCalendar.get(Calendar.YEAR),myCalendar.get(Calendar.MONTH),myCalendar.get(Calendar.DAY_OF_MONTH)).show();
            }
        });
    }

    private void updateLabel(){
        String myFormat="dd/MMM/yyyy";
        SimpleDateFormat dateFormat=new SimpleDateFormat(myFormat, Locale.US);
        txtDatepicker.setText(dateFormat.format(myCalendar.getTime()));
    }
}
Final Result:

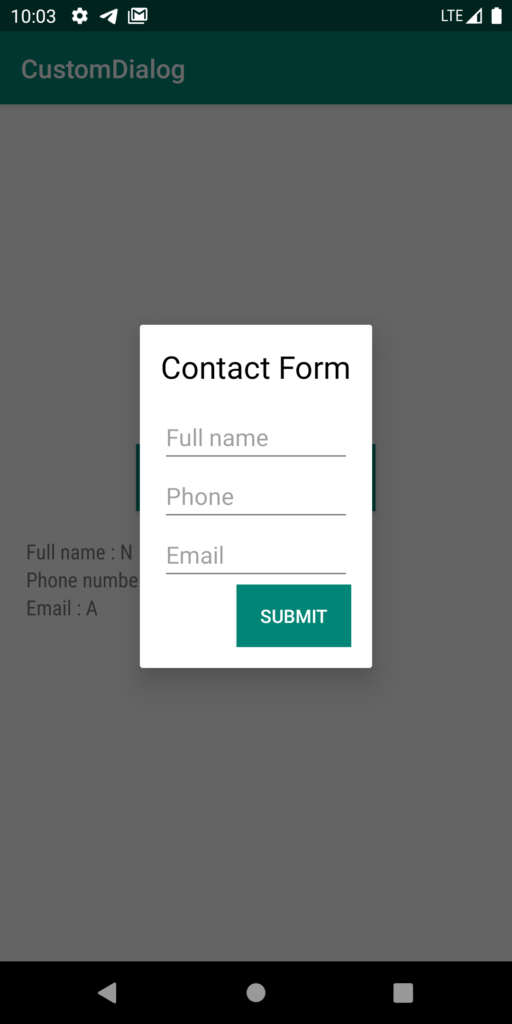
How to create Custom Dialog in Android Studio
Custom Dialog is a small window that prompts the user for doing something with developer requirements.
- Project name: Custom Dialog
- Package name: com.eangkor.customdialog
- Language: Java
1- activity_main.xml
res>layout>activity_main.xml
<?xml version="1.0" encoding="utf-8"?>
<LinearLayout xmlns:android="http://schemas.android.com/apk/res/android"
    xmlns:app="http://schemas.android.com/apk/res-auto"
    xmlns:tools="http://schemas.android.com/tools"
    android:layout_width="match_parent"
    android:layout_height="match_parent"
    tools:context=".MainActivity"
    android:gravity="center"
    android:orientation="vertical">

    <Button
        android:layout_width="wrap_content"
        android:layout_height="wrap_content"
        android:text="@string/open_custom_dialog"
        android:background="@color/colorPrimary"
        android:padding="16dp"
        android:textColor="@color/colorWhite"
        android:id="@+id/open_dialog"/>

    <TextView
        android:id="@+id/info_name"
        android:layout_width="match_parent"
        android:layout_height="wrap_content"
        android:fontFamily="sans-serif-condensed"
        android:gravity="left"
        android:paddingLeft="20dp"
        android:paddingTop="20dp"
        android:textSize="16sp"
        android:visibility="visible" />

    <TextView
        android:id="@+id/info_phone"
        android:layout_width="match_parent"
        android:layout_height="wrap_content"
        android:fontFamily="sans-serif-condensed"
        android:gravity="left"
        android:paddingLeft="20dp"
        android:textSize="16sp"
        android:visibility="visible" />

    <TextView
        android:id="@+id/info_email"
        android:layout_width="match_parent"
        android:layout_height="wrap_content"
        android:fontFamily="sans-serif-condensed"
        android:gravity="left"
        android:paddingLeft="20dp"
        android:textSize="16sp"
        android:visibility="visible" />

</LinearLayout>
2- custom_dialog.xml
res>layout> create a custom_dialog.xml file
<?xml version="1.0" encoding="utf-8"?>
<LinearLayout xmlns:android="http://schemas.android.com/apk/res/android"
    android:orientation="vertical" android:layout_width="match_parent"
    android:layout_height="wrap_content"
    android:layout_margin="16dp">

    <TextView
        android:layout_width="wrap_content"
        android:layout_height="wrap_content"
        android:text="@string/title_dialog"
        android:textSize="24sp"
        android:textColor="@color/colorBlack"
        android:layout_marginBottom="16dp"/>

    <EditText
        android:layout_width="match_parent"
        android:layout_height="wrap_content"
        android:hint="@string/full_name"
        android:inputType="text"
        android:imeOptions="actionNext"
        android:id="@+id/full_name"/>

    <EditText
        android:layout_width="match_parent"
        android:layout_height="wrap_content"
        android:hint="@string/phone_number"
        android:inputType="phone"
        android:imeOptions="actionNext"
        android:id="@+id/phone_number"/>
    <EditText
        android:layout_width="match_parent"
        android:layout_height="wrap_content"
        android:hint="@string/email"
        android:inputType="textEmailAddress"
        android:imeOptions="actionNext"
        android:id="@+id/email"/>
    <Button
        android:layout_width="wrap_content"
        android:layout_height="wrap_content"
        android:layout_gravity="end"
        android:text="@string/submit"
        android:textColor="@color/colorWhite"
        android:background="@color/colorPrimary"
        android:id="@+id/submit_button"/>
</LinearLayout>
3- strings.xml
res>values>strings.xml
<resources>
    <string name="app_name">CustomDialog</string>
    <string name="name">Name</string>
    <string name="phone_number">Phone</string>
    <string name="submit">Submit</string>
    <string name="open_custom_dialog">Open Custom Dialog</string>
    <string name="title_dialog">Contact Form</string>
    <string name="full_name">Full name</string>
    <string name="email">Email</string>
</resources>
4- colors.xml
res>values>colors.xml
<?xml version="1.0" encoding="utf-8"?>
<resources>
    <color name="colorPrimary">#008577</color>
    <color name="colorPrimaryDark">#00574B</color>
    <color name="colorAccent">#D81B60</color>
    <color name="colorWhite">#FFF</color>
    <color name="colorBlack">#000</color>
</resources>
5- MainActivity.java
package com.eangkor.customdialog;

import androidx.appcompat.app.AppCompatActivity;
import android.app.Dialog;
import android.os.Bundle;
import android.view.View;
import android.view.Window;
import android.widget.Button;
import android.widget.EditText;
import android.widget.TextView;

public class MainActivity extends AppCompatActivity {

    Button openDialog;
    TextView infoName,infoPhone,infoEmail;

    @Override
    protected void onCreate(Bundle savedInstanceState) {
        super.onCreate(savedInstanceState);
        setContentView(R.layout.activity_main);

        openDialog = findViewById(R.id.open_dialog);
        infoName = findViewById(R.id.info_name);
        infoPhone = findViewById(R.id.info_phone);
        infoEmail = findViewById(R.id.info_email);
        openDialog.setOnClickListener(new View.OnClickListener() {
            @Override
            public void onClick(View view) {
                showCustomDialog();
            }
        });
    }

    //Function to display the custom dialog.
    void showCustomDialog() {
        final Dialog dialog = new Dialog(MainActivity.this);
        dialog.requestWindowFeature(Window.FEATURE_NO_TITLE);
        dialog.setCancelable(true);
        dialog.setContentView(R.layout.custom_dialog);

        final EditText edit_Fullname = dialog.findViewById(R.id.full_name);
        final EditText edit_Phone = dialog.findViewById(R.id.phone_number);
        final EditText edit_Email = dialog.findViewById(R.id.email);
        Button submitButton = dialog.findViewById(R.id.submit_button);

        submitButton.setOnClickListener(new View.OnClickListener() {
            @Override
            public void onClick(View v) {
                String name = edit_Fullname.getText().toString();
                String phone = edit_Phone.getText().toString();
                String email = edit_Email.getText().toString();
                if (name != null && !name.isEmpty()){
                    infoName.setText("Full name : "+name);
                    infoPhone.setText("Phone number : "+phone);
                    infoEmail.setText("Email : "+email);
                }
                dialog.dismiss();
            }
        });
        dialog.show();
    }
}
Final Result: