In Windows 10 or 11, Converting a disk from MBR to GPT partitioning without reinstalling Windows, modifying, deleting, or losing data on the disk can be achieved using the built-in Disk Management tool, command-line utility “mbr2gpt”, or command-line utility “diskpart”.
Master Boot Record (MBR) disks use the standard BIOS partition table. And GUID partition table (GPT) disks use the Unified Extensible Firmware Interface (UEFI).
However, before proceeding with the conversion methods, it’s crucial to back up your important data from your PC to an external hard drive or cloud storage to avoid losing your data.
Windows Contents:
Method 1: Disk Management Tool
Here are the steps to convert MBR to GPT using the Disk Management tool:
1. Right-click the Windows Start button, and then select “Disk Management“.
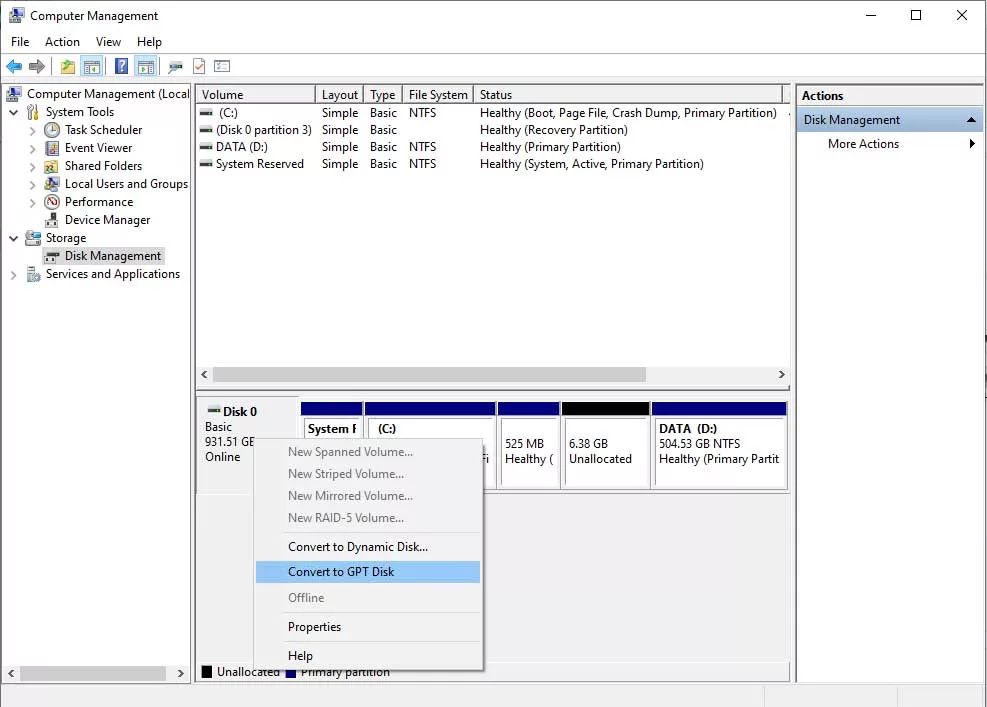
2. Identify the disk you want to convert from MBR to GPT, and then right-click the disk and select “Convert to GPT Disk“.
3. Click “OK” to confirm the conversion.

But on the Convert to GPT Disk was disabled, So please go to method 2.
Method 2: Using the mbr2gpt Command-line
For example
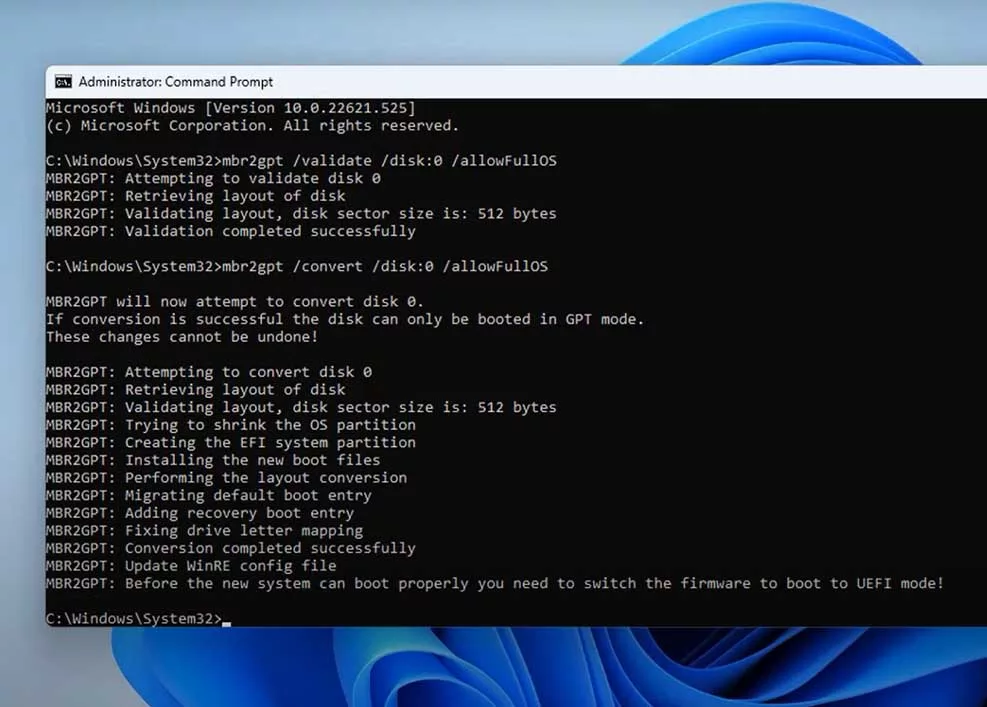
I select Disk 0 to convert to GPT Disk, but you can select which Disk you want to convert.
1. Click the Windows Start button and type “cmd” in the search bar.
2. Right-click on “Command Prompt” in the search results and select “Run as administrator“. If prompted by User Account Control, click “Yes“.
3. In Command Prompt, type one command-line and press “Enter“
mbr2gpt /validate /disk:0 /allowFullOS
mbr2gpt /convert /disk:0 /allowFullOS
Note: Before the Windows OS can boot properly you need to switch the firmware to boot to UEFI mode.
4. Restart the PC
5. Go to UEFI BIOS Utility
Restart and immediately press the key required to enter the BIOS Setup Utility. This key can vary depending on your computer’s manufacturer, but it’s usually F2, F10, F12, or Del
6. On UEFI BIOS Utility, go to the Boot tab and change
Boot Device Control: UEFI and Legacy OPROM
Boot from Storage Devices: UEFI driver first
7. Press F10 to save your changes and exit the BIOS Setup Utility
Method 3: Using Diskpart Command-line
Here are the steps to convert MBR to GPT using the diskpart command:
1. Click the Windows Start button and type “cmd” in the search bar.
2. Right-click on “Command Prompt” in the search results and select “Run as administrator“. If prompted by User Account Control, click “Yes“.
3. Type “diskpart” and press Enter.
4. Type “list disk” and press Enter to show all available disks.
5. Identify the disk you want to convert from MBR to GPT.
6. Type “select disk X” (replace X with the disk number, for example: disk 0) and press Enter.
7. Type “convert gpt” and press Enter to start the conversion process.
8. Type “exit” and press Enter to close the diskpart utility.
Important Note:
– Back up your important data from your PC to an external hard drive or cloud storage
– In third methods, make sure to select the correct disk to avoid data loss.


